Your iPhone IP address can be changed to help troubleshoot network problems, improve privacy, or enable access to geo-restricted content. This covers what an IP address is, how iOS manages them, as well as step-by-step instructions to renew, manually set, or conceal your iPhone's IP.
Summary of Key Points
- The dynamic IP address is the most common. It is provided by your internet service through DHCP.
- You can either renew the lease and have a new IP given or choose a static IP address which is a fixed configuration.
- To conceal your IP address, use a HTTP(S) proxy configuration or a VPN app available on the App Store.
Precis iPhone IP Addresses
Your iPhone accesses the internet by using an IP address to identify and locate data and route it to a specific location.
Distinction Between IPv4 and IPv6 Addresses
- IPv4 addresses are 32-bit numeric labels and an example is 192.168.0.10.
- IPv6 addresses expand from 32-bit to 128-bit notational systems.
Public vs. Private IP Addresses
- Public IP addresses allow visibility to websites and services.
- A private IP address is not visible outside a given network, for example, 192.168.x.x is confined to the Wi-Fi network.
Dynamic vs. Static IP Addresses
- Your internet service uses Dynamic IP Addresses which change periodically via DHCP.
- Hosting services or remote access requires using static IP addresses which remain constant.
1. Renewing Your IP (Dynamic IP)

On iOS, to renew a DHCP reassigned IP:
- Settings > Wi-Fi
- Click on the ℹ️ button for your connected Wi-Fi.
- Confirm after tapping on Renew Lease.
- iOS phones remove the old info on addresses and repurchase DHCP IP, subnet mask, and router info[1].
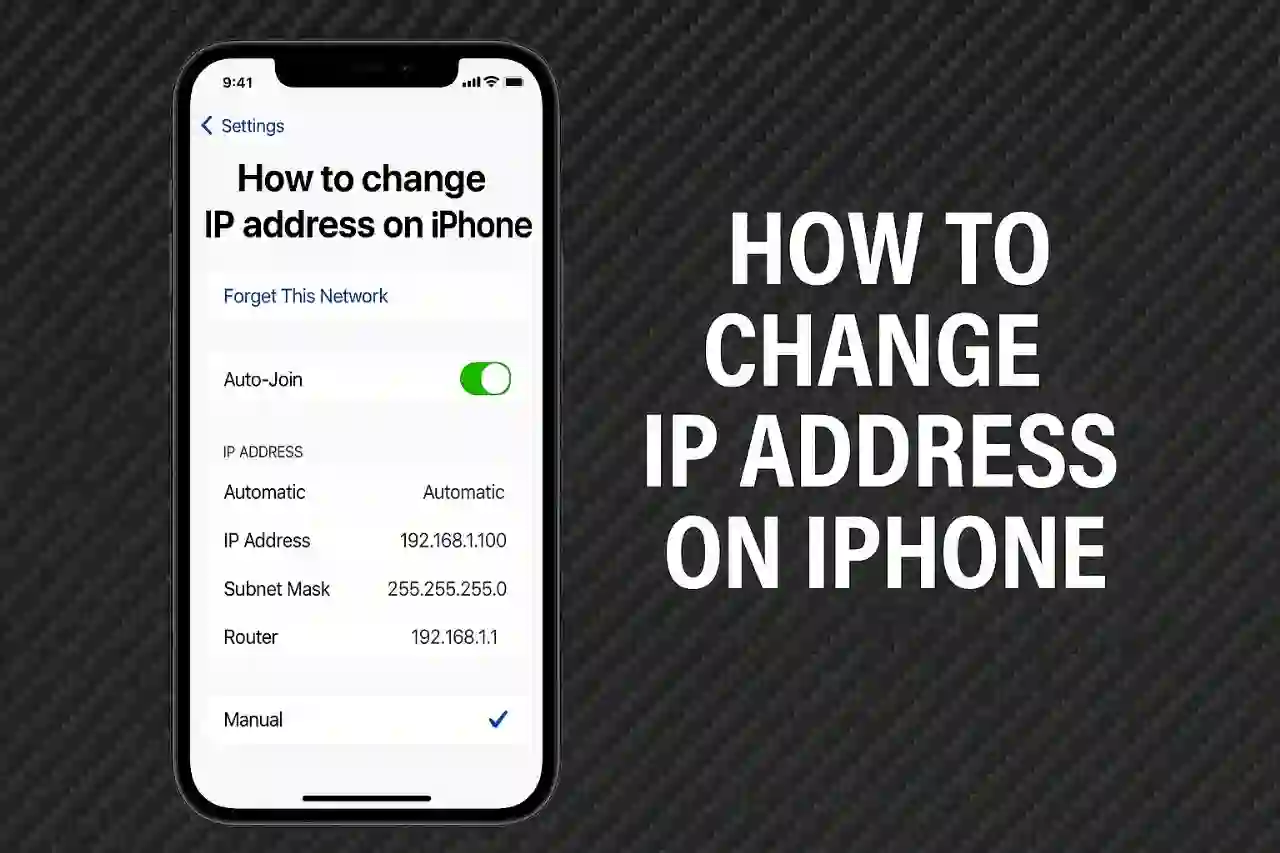
2. Assigning a Static IP Address
This method is used for home and office networks to keep a persistent IP address.
Procedure:
- Settings ▶ Wi-Fi > Tap ℹ️ for your active network.
- Under IPv4 Address choose Manual and fill in:
- IP Address (any unused address from the network range).
- Subnet Mask (usually 255.255.255.0 for home networks).
- Router (the gateway IP).
- Tap Save and your iPhone will maintain a static IP address until switched to Automatic[2].
3. Proxy Server Configuration
A proxy server helps people to filter content, maintain privacy, as well as bypass geo-restrictions, by relaying their HTTP(S) requests. To configure the proxy server on your device:
- Proceed to Settings ▶ Wi-Fi and click on ℹ️ next to your network.
- In the HTTP Proxy section, click on Configure Proxy.
- Either select Manual to type in details directly or Automatic to use a PAC URL.
- Provide the Server, Port, and check Authentication if necessary, then click Save[3][4].
4. Masking Your IP Address Through a VPN
A VPN application alters your publicly visible IP address by passing your traffic through offshore servers:
- Install a VPN application, for instance, ExpressVPN, available in the App Store.
- Log in, select the server location, and click Connect.
- Your public IP address shifts to the VPN-assigned IP which conceals your actual IP and encrypts data in motion[5].
5. Recommended Procedures and Common Issues
- Check if you are on the correct Wi-Fi network while changing the configurations.
- Toggle Airplane Mode on and off to refresh cellular and Wi-Fi connections and force IP refresh.
- Static IPs outside the range of DHCP-assigned addresses on your router will maintain IP stability and prevent conflicts.
- In Settings ▶ Wi-Fi ▶ ℹ️, the Private Address option should remain activated to maintain privacy based on MAC addresses. Only turn off if a network requires the device’s true hardware address[6].
References
- [1] Get a New IP Address on iPhone or iPad by Renewing DHCP Lease
- [2] How to Set a Static IP Address on iPhone
- [3] How to Configure Proxy on iPhone
- [4] How to set a proxy server for Wi-Fi on iPhone and iPad
- [5] How to change your IP address on iPhone
- [6] Use private Wi-Fi addresses on iPhone
- [7] Apple Community: How to change IP address on iPhone
- [8] Apple Support: Configure IP addresses
- [9] YouTube: How to Change IP Address on iPhone
- [10] iPhone Proxy Settings: A Comprehensive Guide
- [11] NordVPN: How to set up a static IP address
- [12] AVG: How to change your IP address on iPhone
- [13] OSXDaily: Set Manual DHCP & Static IP Address on iPhone & iPad
- [14] YouTube: How to Set Static IP on iPhone
- [15] The Tech Edvocate: How to Change the IP Address on iPhone
- [16] YouTube: How to Change IP Address on iPhone
- [17] YouTube: How to Change Your IP Address on iPhone
- [18] How-To Geek: How to Change the IP Address on iPhone
- [19] YouTube: How to Change IP Address on iPhone
- [20] YouTube: How to Change IP Address on iPhone
- [21] University of Oregon: iOS - Setting a Static IP Address
- [22] Apple Support: Enter proxy server settings on Mac
- [23] Apple Community: How to set static IP on iPhone
- [24] Apple Support: Configure IP addresses for an interface
- [25] Apple Support: Configure IPv6 addresses
- [26] NogenTech: What Does Renew Lease Mean on WiFi
- [27] Solve Your Tech: How to Renew Your Wireless Connection on an iPhone 7
- [28] AppleInsider: How to renew your DHCP lease on macOS
- [29] Super User: How do I force my iPhone to obtain a new IP address
- [30] TunesKit: How to Renew Lease on WiFi for iPhone
- [31] Chip.de: Lease erneuern bei iPhone & iPad: So geht's am schnellsten
- [32] Apple Support: Change TCP/IP settings on Mac